This is the second article about AI fundamentals, this time we will cover building a non-technical AI assistant using an IDE-first workspace and an LLM subscription
Introduction
The goal here is to create an assistant that “understands” your work, product and company so it provides effective support by automating some repeatable or time-consuming tasks. A useful assistant is a small operating system made from clear instructions, reliable memory, reusable skills, guardrails, and structured outputs. The Integrated Development Environment (IDE) becomes the home where models, instructions, memory, and files come together. This is why the workspace structure matters more than the specific brand of assistant. You can use any free IDE tool, such as Visual Studio Code, Antigravity, or Cursor, as well as Claude Code, Codex, and other agentic coding or writing tools.
Important distinction: the IDE agent, the model, and the browser assistant are not the same thing. An IDE agent is the tool that can read and edit files in your IDE workspace. The model is the reasoning engine behind it. A browser assistant is usually a separate chat-style product.
Browser Tools vs IDE-Based Tools
AI tools broadly fall into two operating models.
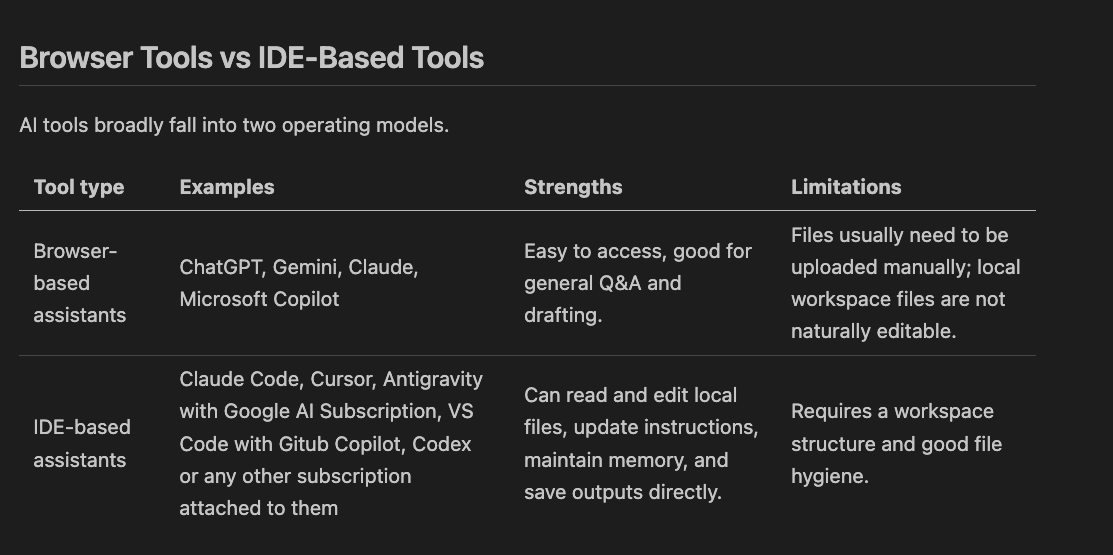
Figure 1 – Browser vs. IDE
Here are the benefits of using an IDE-based agents:
- Reduced hallucination risk by grounding the assistant in local source files.
- Keep generated outputs traceable and reusable.
- Preserve long-term context across chats.
- Convert repeated manual prompts into repeatable skills or workflows.
Key Concepts
Below you can see the most important concepts and elements of the agentic workspace. I won’t explain prompts as we discussed them in the previous article
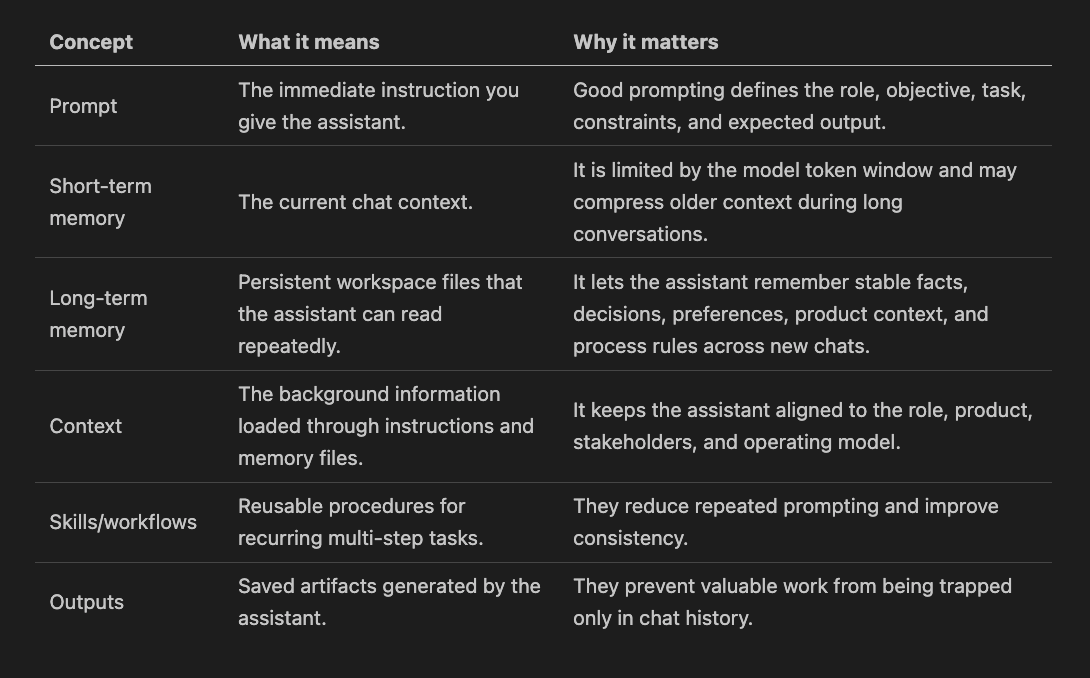
Figure 2 – Key concepts
Memory: Short-Term vs Long-Term
Short-Term memory
Short-term memory is the current chat’s token limit.
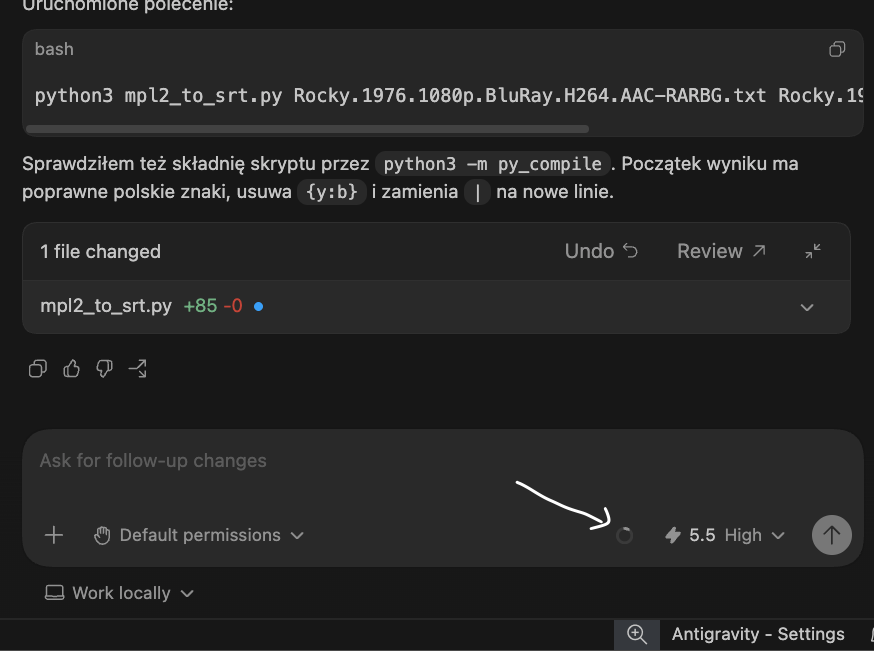
Figure 3 – Short-term memory
Once the limit is reached, the chat may compress older information. This can make the assistant lose detail, mix up facts, or hallucinate.
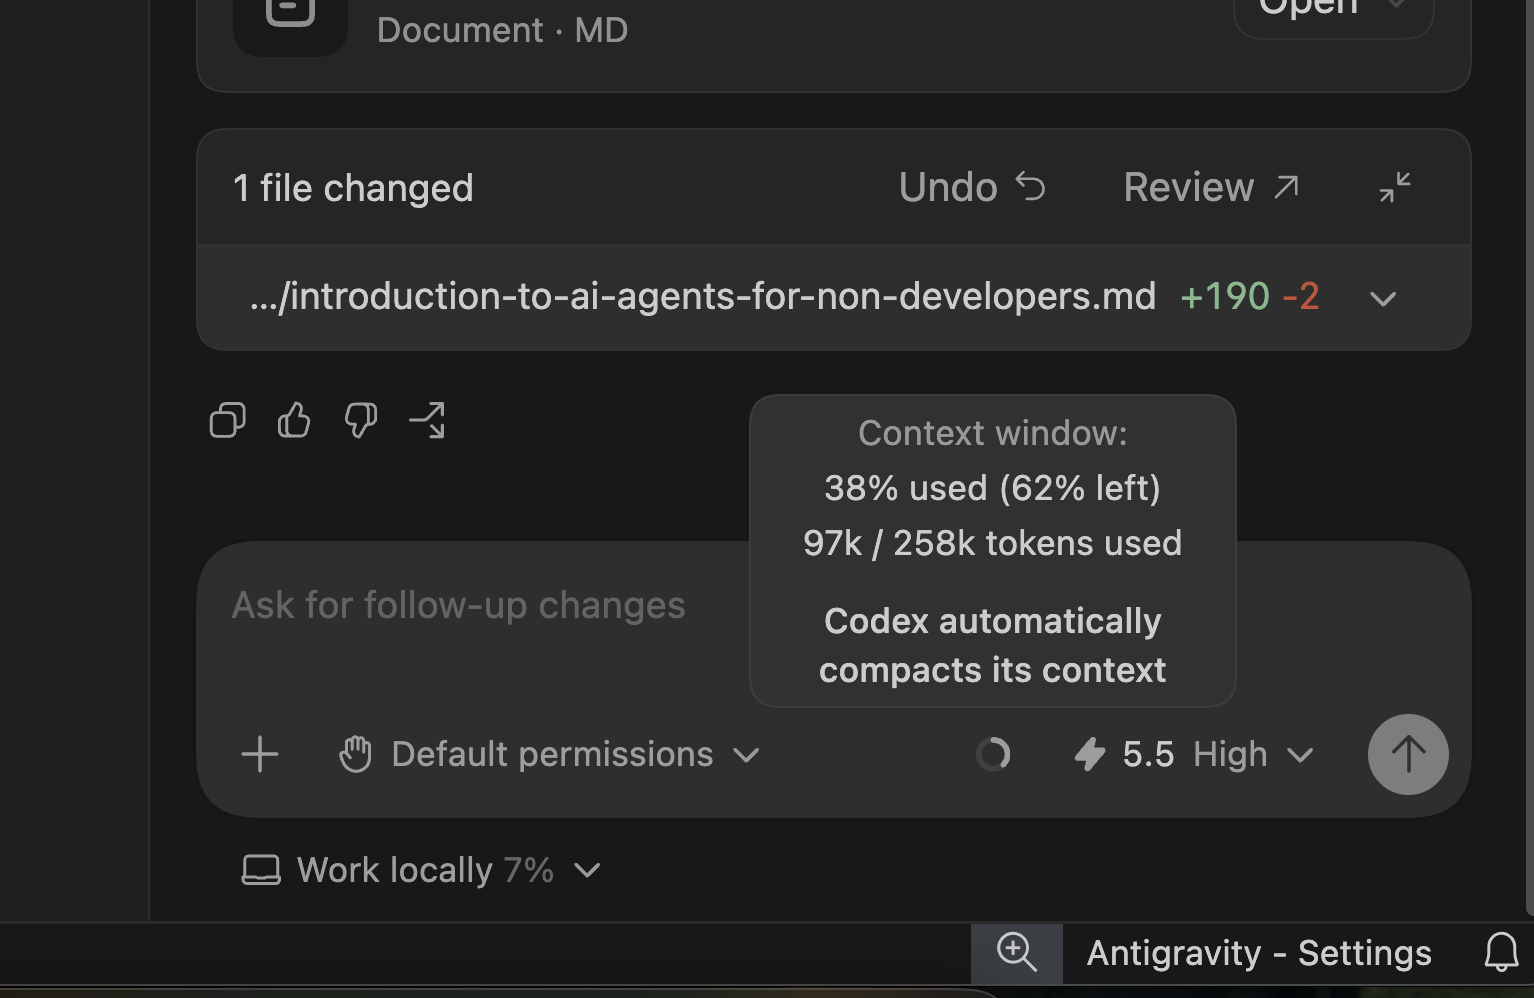
Figure 4 – Chat context limits
Long-Term memory
Long-term memory is stored as files in the workspace. These files can be read whenever a new chat starts, so the assistant does not need to be briefed from scratch every time.
Useful memory files can include:
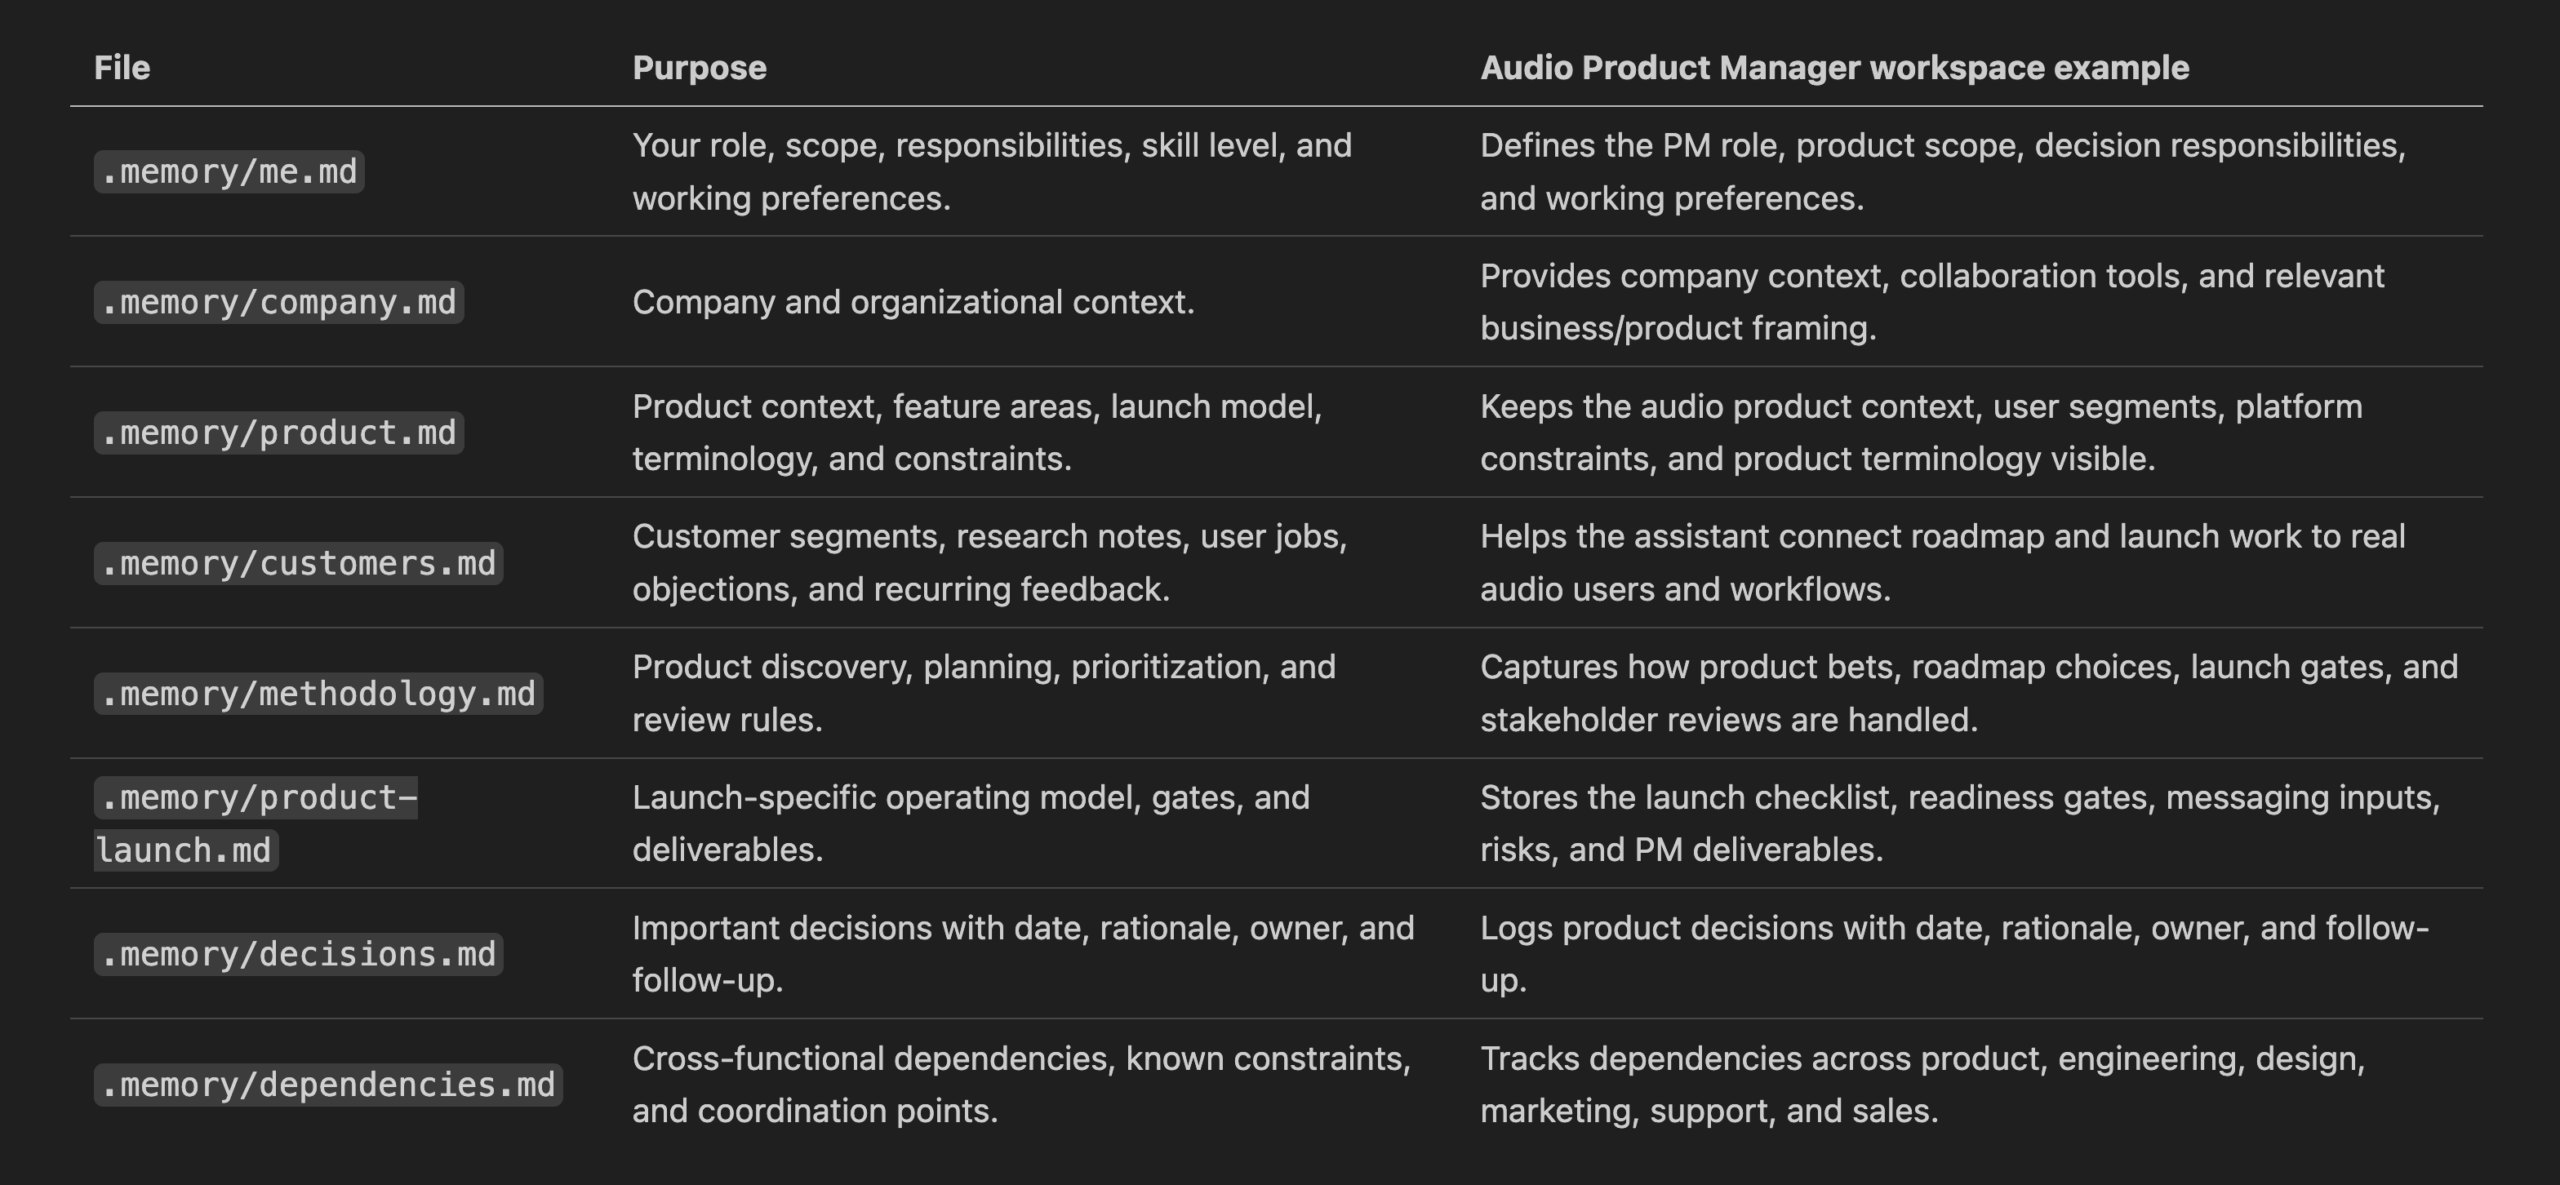
Figure 5 – Example of a product manager’s memory
Context and Master Instructions
Every assistant workspace should have a master instruction file in the root folder. For a cross-platform setup, create one source file and let the other agent instruction files point to it.

Figure 6 – Master prompts
This means you maintain the instructions in CLAUDE.md, while GEMINI.md and AGENTS.md are symbolic links to the same file. Claude, Gemini, and OpenAI-style agents can then read the same master prompt without you maintaining three separate copies.
GitHub Copilot has a different convention. In Copilot, the master instruction file usually lives at .github/copilot-instructions.md, and reusable prompts often live under .github/prompts/.
The master instruction file is the assistant’s single source of truth for always-on behavior. It should define:
- The role the assistant should play.
- The primary responsibilities of the assistant.
- The expected tone and output style.
- How to handle risks, decisions, assumptions, and missing information.
- Which memory files to check before giving substantive recommendations.
- How to route work to specific skills, prompts, or agents.
The ideal setup is for the master instruction file to explicitly route the assistant into the memory files. For example: before producing roadmap or launch planning advice, check .memory/product.md, .memory/customers.md, and .memory/product-launch.md.
Recommended Workspace Structure
This example uses an audio Product Manager’s workspace: a local IDE folder with a file and folder structure.
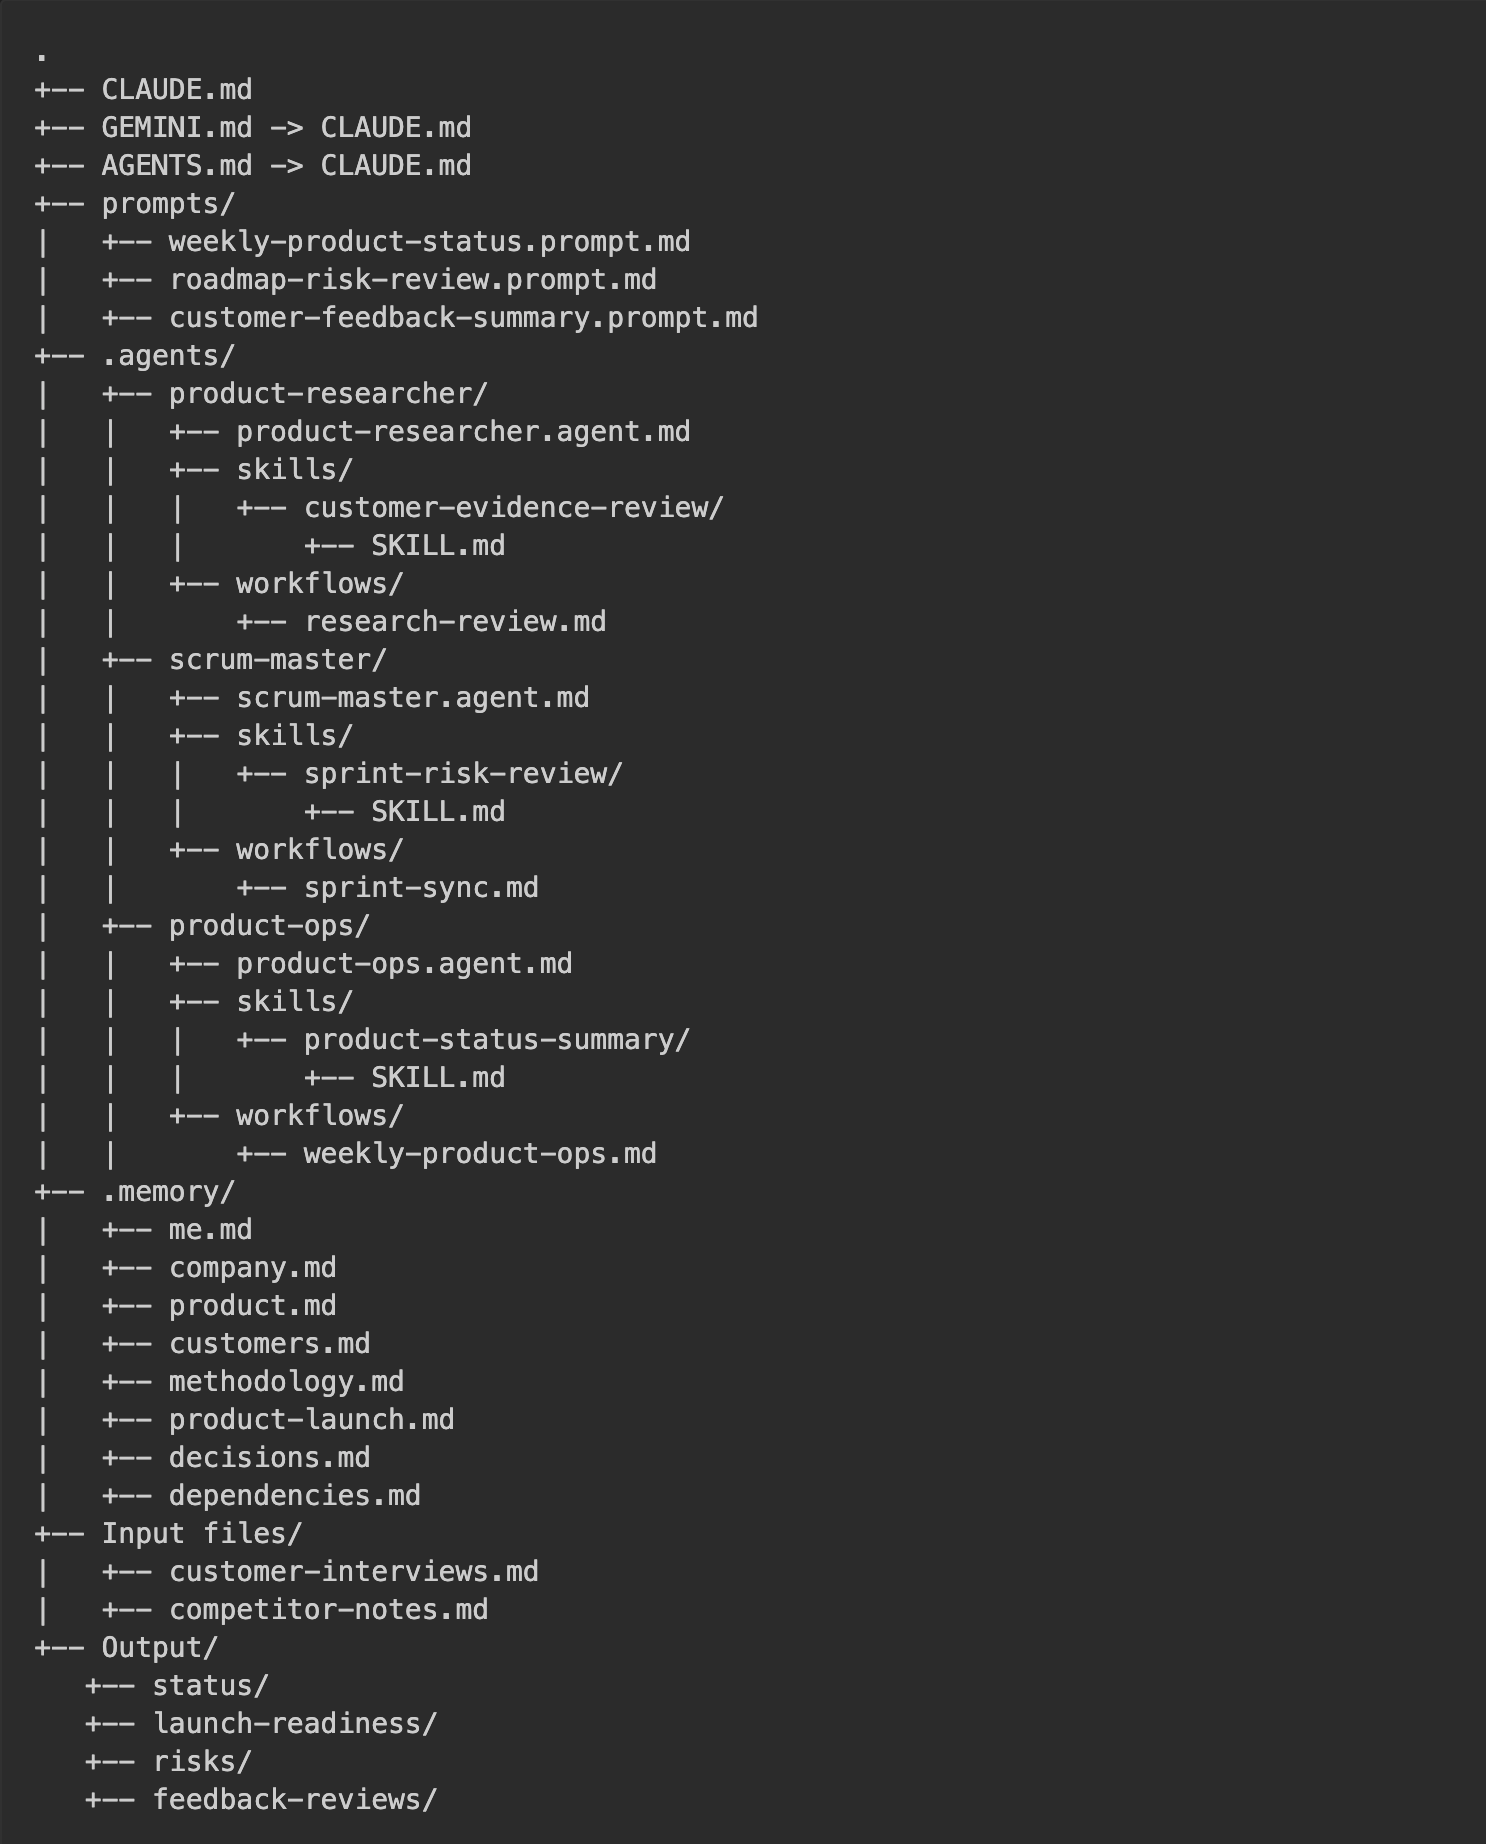
Figure 7 – Example of the workspace structure in the IDE
What goes where
1. CLAUDE.md, GEMINI.md, and AGENTS.md
Use these for master behavior. Maintain the real content in CLAUDE.md, then create GEMINI.md and AGENTS.md as symbolic links to CLAUDE.md so all three agent families read the same instructions.
Include:
- Role and mission.
- Core responsibilities.
- Tone and output style.
- Risk and decision handling rules.
- Required context loading behavior.
- Routing to specific agents, skills, prompts, and memory files.
Audio PM example: you are an assistant supporting a Product Manager working on professional audio products, including discovery, roadmap planning, customer evidence synthesis, launch readiness, and stakeholder communication. You must read .memory/product-launch.md, .memory/customers.md, .memory/methodology.md, .memory/product.md, and .memory/decisions.md before taking any action and you must log important decisions in .memory/decisions.md.
Important note: GitHub Copilot uses a different structure. For Copilot, create .github/copilot-instructions.md instead of relying only on the root instruction files.
2. .memory/
Use this for persistent context (long-term memory)
Store stable facts that the assistant should repeatedly use, such as:
- Your role and responsibilities.
- Product scope and terminology.
- Stakeholder ownership and escalation paths.
- Product discovery, roadmap, and launch methodology.
- Decision history.
- Known constraints and dependencies.
This reduces repeated prompting and helps avoid hallucinations because the assistant has a stable local source of truth.
3. .agents/
Use this for role-specific sub-agent packages.
Good sub-agents are narrow and outcome-focused. Each agent should have its own folder under .agents/, with the agent definition plus any skills and workflows that belong to that agent.
Recommended structure:
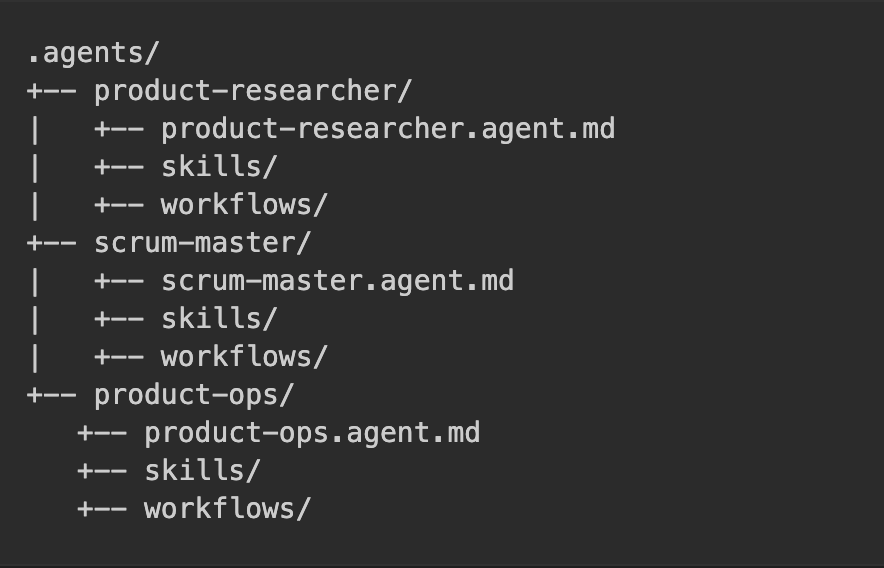
Figure 8 – How to structure sub-agents
Example:

Figure 9 – What do the agents do
4. Agent-level skills/
Use this for reusable multi-step procedures.
Each skill should live under the relevant agent’s skills/ folder and include a SKILL.md file. The file name matters; do not rename it to something custom if the tool expects SKILL.md.
A good skill definition includes:
- Trigger conditions: when the assistant should use it.
- Inputs: what the user must provide.
- Steps: the repeatable process.
- Outputs: the expected artifact.
- Quality checks: how to verify the result.
Example skills:
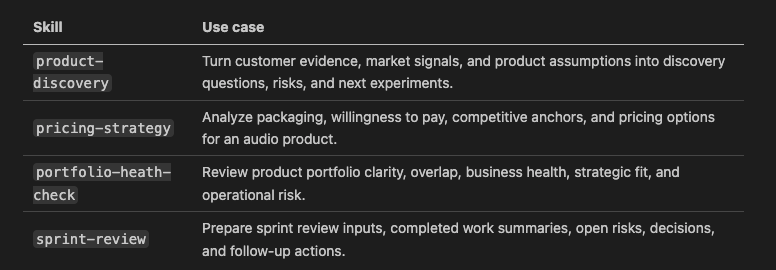
Figure 10 – PM skills in IDE workspace
Useful tip: you can download ready-made skills from and upload them, and adjust them to your workspace
- https://mcpmarket.com/tools/skills (my favourite marketplace)
- https://github.com/samueltauil/skills-hub
5. Agent-level workflows/ and prompts/
Use workflows for orchestrated recurring tasks that belong to a specific agent. A workflow can chain multiple skills, define the source collection sequence, and specify where the output should be saved.
Example workflows:
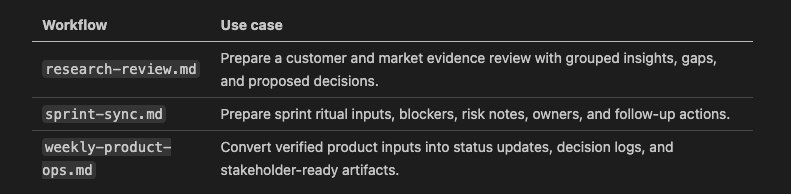
Figure 11 – PM workflows
Use the root prompts/ folder for reusable one-shot commands.
GitHub Copilot note: Copilot commonly expects reusable prompts in .github/prompts/, so mirror or adapt this folder if you are using Copilot as the primary IDE assistant.
Prompts are useful when the task is recurring but does not need a full workflow. Examples:
- Draft a weekly audio product status using
.memory/product-launch.md,.memory/customers.md, and.memory/decisions.md. - Create a product sync agenda using unresolved items from
.memory/dependencies.md. - Convert
Input files/AI Agents 101.pptxplus narration notes into a publish-ready Confluence page draft inOutput/. - Summarize a customer feedback review into decisions/actions and append key decisions to
.memory/decisions.md.
6. Output/
Use this for saved artifacts.
Do not let valuable work exist only in chat history. Save generated summaries, reports, analyses, and meeting notes into structured output folders.
Example output folders:
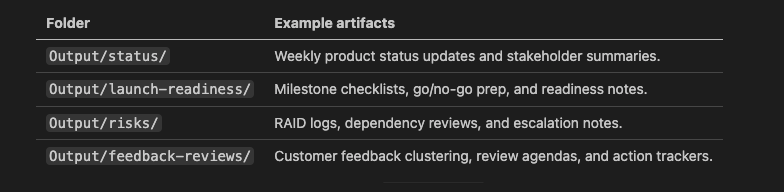
Figure 12 – Structure of output folders
Guardrails
Guardrails make the assistant safer and more reliable.
Recommended guardrails:
- Treat external skills as draft templates until validated.
- Require sources for factual claims.
- Separate facts, assumptions, and open questions.
- Do not invent owners, dates, source IDs, customer evidence, or decisions.
- Log important decisions with date, rationale, owner, and follow-up.
- Log notable assistant mistakes and update instructions when patterns repeat.
Recommendation: upload to workspace this special ZERO_HALLUCINATION_PROTOCOL.md and ask your assistant to integrate it into the master instruction and memory files
Extensions
Extensions expand what the assistant can do inside the IDE by adding capabilities such as source control workflows, issue tracking integration, documentation support, and automation helpers.
Example extensions if you use VS Code for this audio Product Manager workspace:
- GitHub Pull Requests (
GitHub.vscode-pull-request-github) to track PR status and review activity tied to product or launch readiness. - GitLens (
eamodio.gitlens) to inspect code ownership and history when chasing blockers or regression context. - Markdown All in One (
yzhang.markdown-all-in-one) for faster drafting and editing of status updates, plans, and review notes. - markdownlint (
DavidAnson.vscode-markdownlint) to keep generated markdown artifacts clean and consistent before publishing. - Todo Tree (
Gruntfuggly.todo-tree) to quickly surface TODO/FIXME style items during dependency and readiness scans.
Use only trusted extensions, and keep roles/responsibilities in your instruction and memory files so tool capability does not override process guardrails.
Useful tip: you can use more than one subscription in your IDE assistant in the same workspace. For example, you might use Claude Code, Gemini and Codex – you just need to install an extension and log in with your subscription. To avoid maintaining separate master prompts, keep the source instruction in CLAUDE.md, then symlink GEMINI.md and AGENTS.md to it.
MCP Servers
An MCP Server (Model Context Protocol Server) is a service that connects the assistant to external systems through a structured tool interface. It is a protocol that allows an LLM to communicate with service APIs, such as project tracking, documentation, CRM, analytics, or social platforms.
In practice, MCP lets the assistant read/write data in systems like project trackers, documentation spaces, research repositories, and analytics tools using governed tool calls instead of free-form copy/paste.
Why this matters for workspaces:
- Improves traceability by making system interactions explicit.
- Enables repeatable workflows (for example, create/update status pages, fetch product issues, log decisions).
- Reduces manual context switching during product planning and launch coordination.
Best practice: use MCP for live system operations, and keep stable context (roles, process rules, recurring decisions) in .memory files for speed and consistency.
Project Tracking + Documentation via MCP
If your IDE agent supports MCP, connect the product systems you actually use, such as project tracking, documentation, customer research, analytics, or CRM tools. The exact UI depends on the agent and IDE.
Example setup steps in Visual Studio Code:
- Open your IDE’s command palette or MCP settings.
- Run
MCP: Add Server. - Choose the relevant access type for your service.
- Enter the MCP server URL provided by that service.
- Provide a short server name, for example
Product Docs MCPorProject Tracker MCP. - Complete browser login when prompted, then return to your IDE.
- Restart or reload the IDE window if the tool asks for it.
GitHub Copilot note: in VS Code with Copilot, this flow usually starts from the VS Code command palette with Cmd+Shift+P.
Where to Get Skills and Workflows
Prioritise trusted internal sources before public examples.
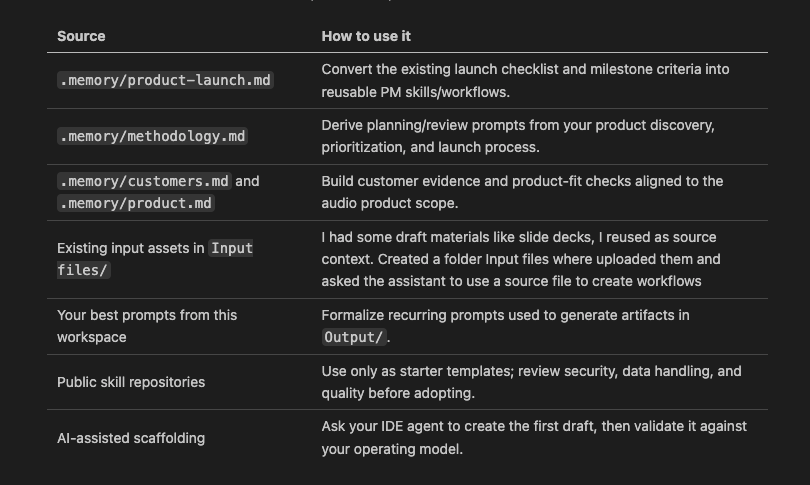
Figure 13 – data sources for prompts and skills
Recommended Adoption Sequence
Start small and build confidence.
1 Build the foundation. Start by creating a workspace folder on your computer and opening it in your preferred IDE:
- Create a new folder on your computer (for example,
Audio PM AssistantorMyAssistant). - Open your IDE.
- Use File > Open Folder (or the equivalent command in your IDE) and select the folder you just created.
- The IDE will now treat this folder as your workspace.
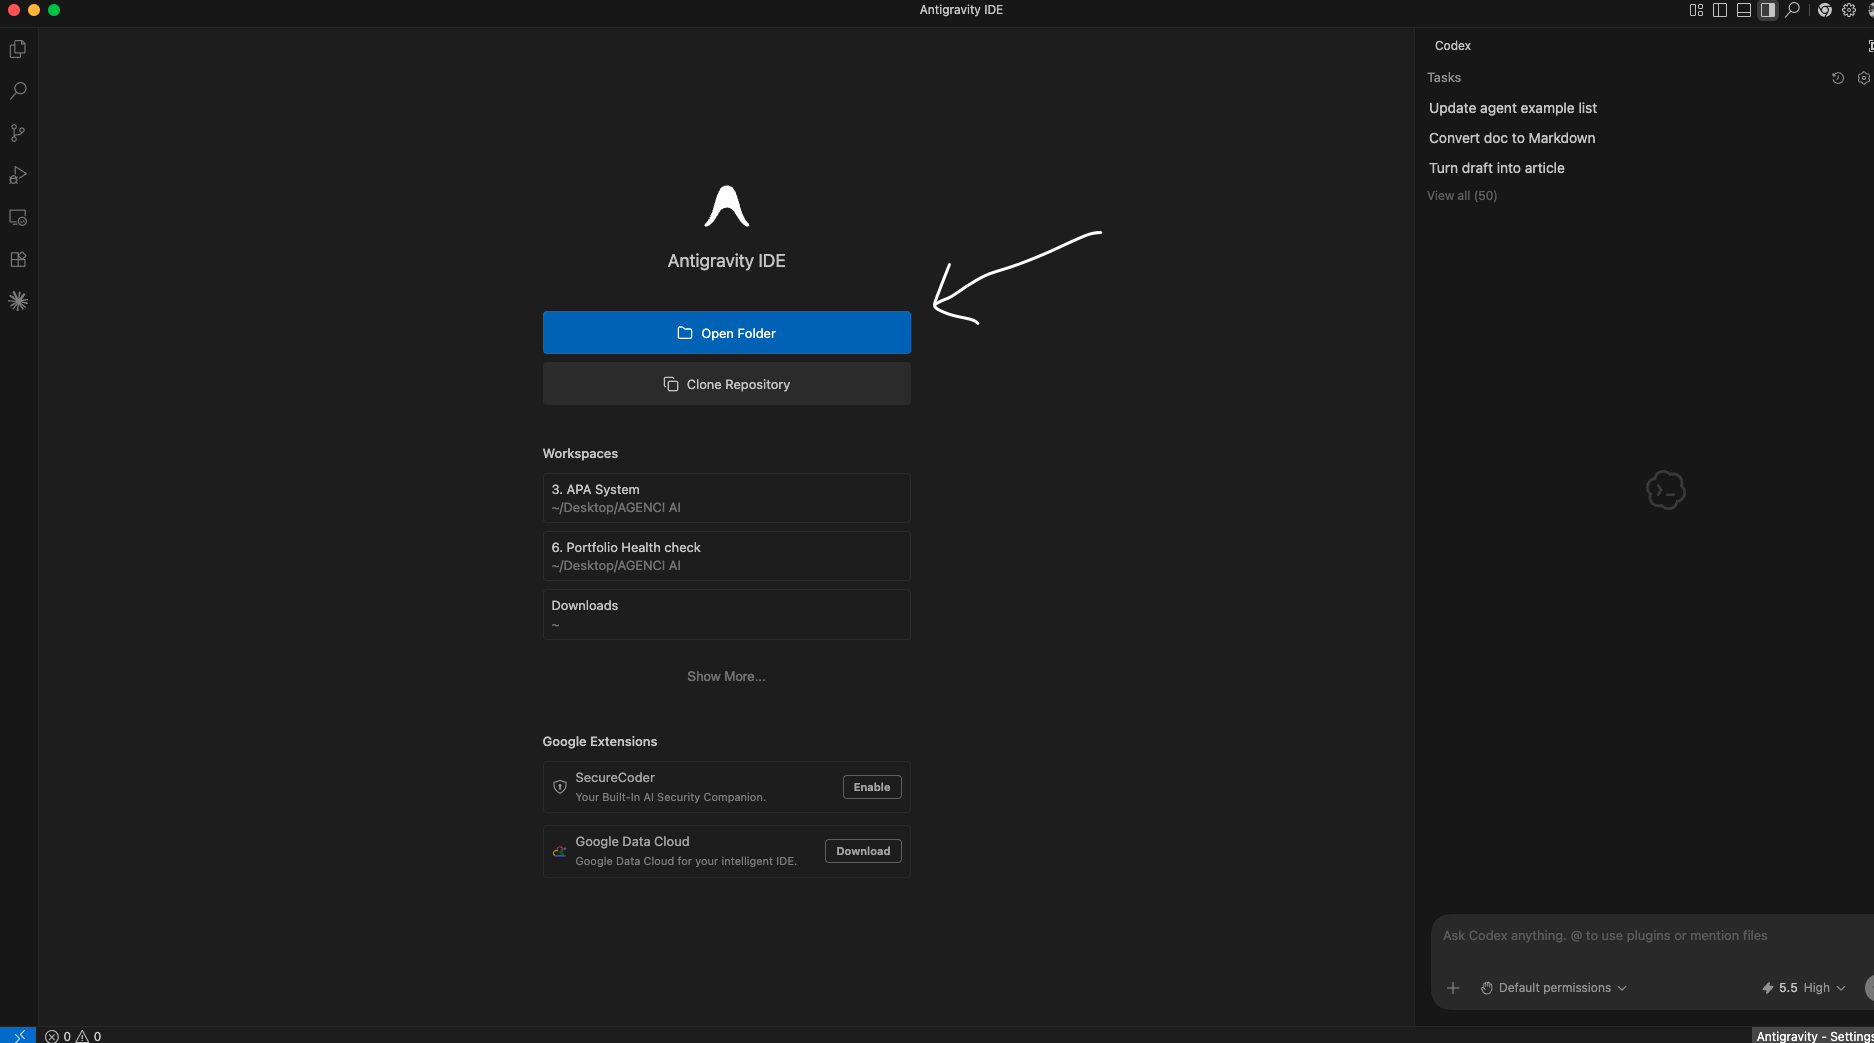
Figure 14 – How to open the IDE folder
2 Once the workspace is open, create the master prompt and core .memory files:
- Create
CLAUDE.mdwith your role, responsibilities, context loading rules, and guardrails. - Create
GEMINI.mdandAGENTS.mdas symbolic links toCLAUDE.mdso Gemini and OpenAI-style agents use the same master prompt. - If you use GitHub Copilot, create
.github/copilot-instructions.mdbecause Copilot follows a different instruction-file convention. - Create
.memory/me.md,.memory/product.md,.memory/customers.md,.memory/methodology.md,.memory/decisions.md, and any other stable context files. - Create
Output/folder structure for saving generated artifacts.
3. Pilot one high-friction workflow. Pick a workflow where the value is obvious in this workspace, such as converting customer feedback and roadmap notes into Confluence-ready status pages and decision logs.
4. Add two or three focused skills (optional, only after repetition is proven). Good first candidates are feedback grouping, launch dependency checking, and product status generation.
5.Add one role-specific sub-agent (optional, later stage). Start with one assistant such as pm-daily, feedback-review, or launch-readiness.
6. Review weekly. Check what worked, what failed, what was confusing, and what should be refined in the instructions or memory files.
Personal Recommendation
Keep the workspace relatively simple, regardless of role.
- Start with one strong master instruction file and high-quality
.memoryfiles. - Run one or two repeatable prompt patterns and save outputs in
Output/. - Default to working without sub-agents and formal skills.
- Add skills only when the same task repeats enough times to justify maintenance.
- Add sub-agents only as a last resort when there is a clear, measurable benefit. (I avoid using them at all)
Quality Rules
Use these rules for every assistant workspace.
- Keep files short and modular.
- Prefer many focused context files over one large file.
- Enforce source-based outputs for factual claims.
- Log key decisions and notable errors.
- Treat external skills as drafts until reviewed.
- Optimize for repeatability, not one-off brilliance.
- Start new chats when the context becomes too long or the task changes.
- Save important outputs into the workspace.
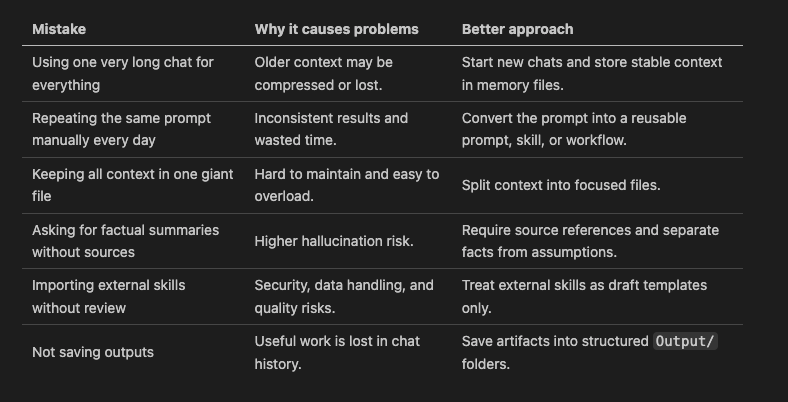
Common Mistakes to Avoid
Other knowledge worth exploring
If you spend a lot of time searching the internet (e.g., product managers/owners looking for some market data), you may want to explore
- https://github.com/microsoft/playwright-cli
- https://www.firecrawl.dev
- https://apify.com
- https://serpapi.com/
Thank you for reading. If you need help in implementing Agentic AI, you can join our workshops:
https://ai-augmented.pm/