I want to give a little overview of one of my favourite product tools: user story mapping. It helps to connect the user jobs (JTBD) to the product roadmap and planning.
1. What user story mapping shows
A user story map lays out a user journey from left to right. Before a team jumps into debating individual features or backlog tickets, the map makes the sequence of what the user actually does visible in one place.
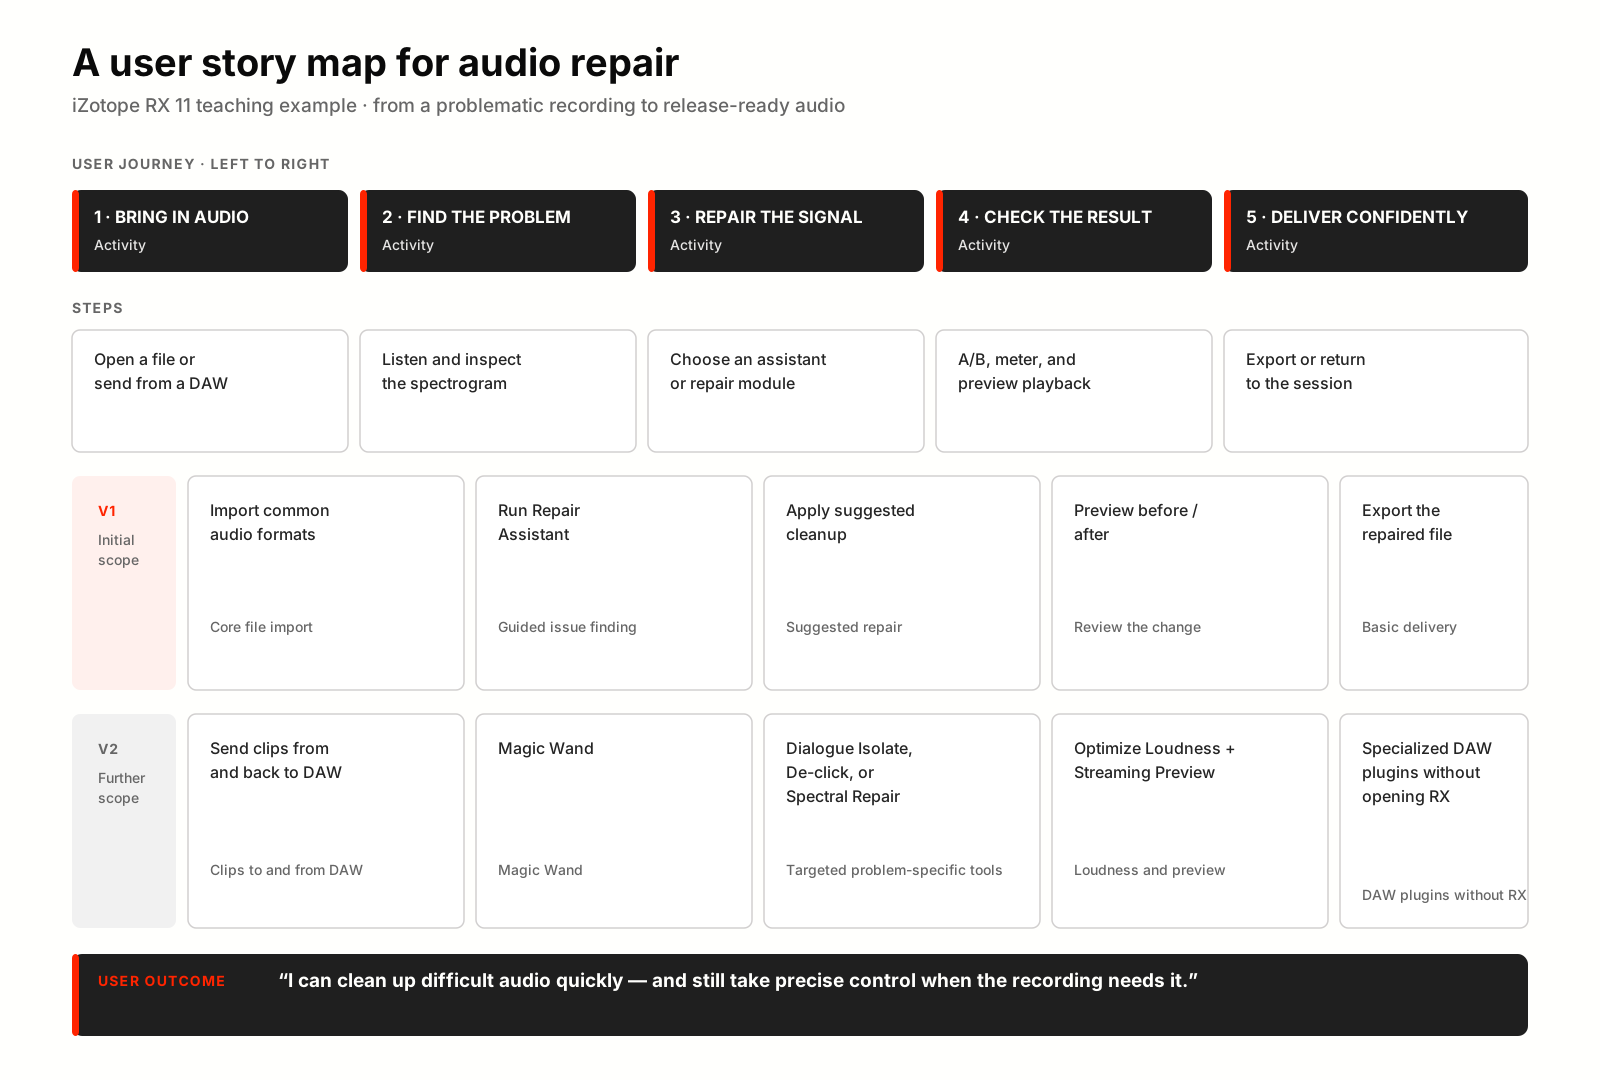
You can find various versions of user story maps online, but the basic structure, as shown in the example picture below (that comes from our upcoming Introduction to Audio Product Management course), organises the map into three levels:
- User activities sit across the top row and represent the larger things a user needs to accomplish along the journey.
- User tasks sit directly underneath each activity, adding detail and showing how the user moves through that part of the workflow.
- User stories group candidate product work horizontally into V1 and V2, making it easier to discuss what belongs in an initial version and what can follow later.
Arranged this way, the map connects what a user is trying to accomplish with the product work that may support each part of the journey. Importantly, it is a shared view for team discussion and planning, not a promise that every item placed on the map will ultimately be built.
2. Why it helps with an early product idea
When you are shaping an early product vision, a flat feature list makes it easy to lose sight of the actual workflow. User story mapping anchors the conversation in a Job to Be Done (JTBD) or a clearly stated user outcome: what is the person actually trying to get done?
From that outcome, you work back toward the beginning of the journey. First, name the major activities the user has to go through. Next, break those activities down into the concrete steps a user may take under each one. Once the journey is clear, place candidate product capabilities or team tasks beneath the specific steps they support. That layout lets the whole team see which work directly contributes to the user outcome—and where the product idea still has gaps or needs clarification.
Finally, you can draw horizontal release slices across the map to discuss a useful first version (V1) versus later scope (V2). For an audio tool like iZotope RX, for example, the desired outcome might be fixing a recording. The team can map the flow from bringing in audio through finding issues, repairing the signal, checking the result, and delivering the finished file. Then, the team can separate the core path needed for V1 (Spectrogram and some basic algorithms) from deeper capabilities (like connecting your DAW via RX Connect, additional repair tools, plugins for DAW, etc.) that can wait for V2. The map makes those scope choices visible across the entire journey, though it does not prove market demand or decide priorities by itself.
3. Why it helps when you take over a product
The same mapping structure is just as useful when you step in as a Product Manager taking over an existing product. Instead of starting from a blank-slate vision or going over the backlog, you reconstruct the user journey from the user’s point of view and place the product’s known capabilities under the steps they currently support.
Walking through the product this way lets you mark what the team knows is already supported, what needs closer investigation, and where a user may get stuck in the workflow. In practice, you treat these annotations as working notes to verify with real product evidence and with the engineers, designers, and support specialists who know the product best.
Once laid out, the map can help to streamline the discussion and help with aligning with the team on current scope, surfacing unanswered questions, and agreeing on possible next steps.
While the example above presents my own imaginary map of iZotope RX 11, not a verified product audit, applying the same left-to-right structure is a practical way to build context quickly on a complex product.
4. Walk through the example
The picture uses an iZotope RX 11 teaching example built around a clear audio post-production job: turning a problematic recording into release-ready audio.
Reading the map from left to right, the user journey moves across five major activities, each broken down into user steps and candidate V1 and V2 release slices:
- Bring in audio: The user needs to open a file or send from a DAW. In V1 (initial scope), the product supports importing common audio formats as core file import. In V2 (further scope), the user can send clips from and back to DAW.
- Find the problem: The user listens and inspects the spectrogram to diagnose what is wrong with the recording. V1 focuses on guided issue finding by letting the user run Repair Assistant, while V2 adds Magic Wand.
- Repair the signal: Next, the user chooses an assistant or repair module. V1 covers applying suggested cleanup for a fast fix, whereas V2 expands into targeted problem-specific tools such as Dialogue Isolate, De-click, or Spectral Repair.
- Check the result: Before committing, the user needs to A/B, meter, and preview playback. V1 provides preview before/after to review the change, while V2 adds loudness and preview with Optimise Loudness + Streaming Preview.
- Deliver confidently: Finally, the user exports or returns to the session. V1 covers basic delivery by exporting the repaired file, and V2 adds specialised DAW plugins that can be added on a track without opening RX.
Looking across the V1 and V2 rows shows how release slicing works across a complete workflow: V1 forms a coherent, guided path from import to export, while V2 layers on DAW integration, targeted tools, and loudness and preview capabilities. Note that these V1 and V2 slices represent a teaching example, not a verified product audit.
Together, both layers support the user outcome at the bottom of the map:
“I can clean up difficult audio quickly — and still take precise control when the recording needs it.”
5. From map to plan
A story map is most valuable when it moves from a static diagram into active team planning:
- Review the journey with the team: Build a map on Miro or any other virtual whiteboard and walk through the map with people who understand both the users and the product. Look for missing steps, duplicated work, or confusing handoffs in the flow, and explicitly note where user or technical evidence is still needed.
- Debate and slice the release scope: Discuss which user outcome and supporting steps genuinely belong in the first (or any upcoming) release, and which can wait for later iterations. Keep the reasons behind those decisions—and any open questions—visible right alongside the scope.
- Connect the map to execution: Turn the selected release slice into concrete work items the team can estimate and plan, while keeping the map accessible as the shared context behind individual tickets.
At the same time, keep the boundary of the tool clear: a user story map helps organise and communicate a plan, but it does not validate demand, settle trade-offs, or set priorities automatically. Those decisions still depend on product discovery, real user evidence, and deliberate trade-off discussions.
6. Summary
I believe that user story mapping is a perfect tool for any startup owner who wants to turn his/her vision into an actionable plan. It can also help PMs who take over a product. User story mapping has helped me a few times in such situations when I had to quickly get up to speed with a complex product.
If you would like to learn more about Product Management tools, make sure you join the waiting list for my upcoming online course “Introduction to Audio Product Management”
Thanks for reading!